How do I bulk upload my products?
Our web console provides an easy way to upload hundreds or thousands of products in one go. This same tool allows you to keep your product catalogue up to date with price changes, de-listings, and other ongoing changes all in a single spreadsheet. Before you use this tool, it is best to upload a single product so that you understand what is being done behind the scenes. Here are the instructions for how to add a single product. Once you are done doing that, follow the instructions below to upload products in bulk.
To access the bulk upload tool:
- Log in to the Onsight web console at https://sales.onsightapp.com.
- Click on ‘Import & export data’ from the left-hand side menu.
- Click on the ‘Products’ menu item.
- Click on ‘Products’
- This will open up the 4-step product import & export tool.
Step 1: Export the product data
If you already have some product information in Onsight, then this step will download all that information for you so that you can make and upload changes. If you have no existing data you will still need to download the datasheet anyway so that you can know how to structure your product datasheet for uploading into Onsight. So click the “Download” button and save the spreadsheet somewhere you will find it easily. Once done, click on ‘Continue’.
Step 2: Change the product data
Open the spreadsheet file. Each row in the spreadsheet represents one of your products. Each column contains some important information about your product. Let’s go through all the columns.
Onsight ID
Onsight ID is the unique number we give to each one of your products in the Onsight Database. Why is it in this sheet? Well, it helps us to know which products you want to update when you want to change your data. For example if you want to change the name, description, product code and other information relating to a specific product, we would not be able to know WHICH product’s information to change without the Onsight ID.
If you’re uploading new products, leave this column blank. If you’re updating existing ones, then keep the same Onsight ID that was downloaded in the sheet to start with.
Product Code, Barcode & SKU
Everyone uses different combinations of codes to track their products. You can use all three or none, it is up to you.
Product Name
Fill in the product name here.
Is Master & Master Product Name
Master products are used to group very similar products together. For example: if you sell t-shirts, and have a particular type of t-shirt called a Plain T, but it comes in different colours and sizes, then you could use a master product called “Plain T” and a variant for each option that you offer – “Plain T Red XL”, PLain T Blue S”, etc.
Do you have to? No, you can create a new product for each of your products – but using master products and variants can make things a little easier to manage over the longer term.
There are two important columns if you want to make use of master products and variants. Firstly, if the row represents a master product, then “Is Master” must be set to “Yes” (it must be “No” if the product is a normal plain vanilla product or a Variant). Secondly, if the row represents a variant, then “Master Product Name” must contain the exact same name as the master product’s name.
Here is some sample master and variant data:
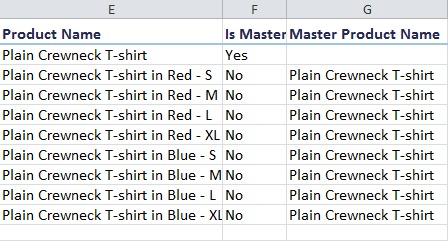
Image URL
Onsight is a visual selling tool so we need images for each of your products. We recommend that you first complete the rest of this document to upload all your product information without images and then afterwards you can upload your images. There are two ways to upload images in bulk. Please see this guide for detailed instructions on how to bulk upload your images.
Cost Price
Onsight has a report in the Reports module that displays your gross profits / margins for each product sold. To calculate this we need the cost price of each product. Use this field to add the cost of sales for the product.
Price
Enter your product’s price here excluding any taxes. To create or manage taxes that must get applied to your products, please go to Setup > Configuration and click on the “Tax Types” tab.
Description
Be as wordy as you like – this is your chance to get detailed product information distributed to all your sales reps.
Is Active
Set this field to “Yes” or “No”. Inactive items are withdrawn from the catalogue so they no longer get displayed.
Is Featured
Set this field to “Yes” or “No”. Featured items are given a more prominent display in your catalogue.
External ID
If you are using CSV files to copy data between Onsight and your internal system, you can use this field to store your internal system’s product ID. That way there can be a link between the product in Onsight and the product in your internal system. If you are not using CSV files to copy data between systems, you can leave this field blank.
Applied Taxes
If your products are taxable, then this is where you specify which taxes must be applied to the product. Of course, you need to have set up the taxes first. Then you can fill in the tax name into this field. To set up your taxes, follow this article.
Is Taxable
If your product is taxable, indicate this with ‘Yes’ or, if your customer is not taxable, indicate this with ‘No’ in this field.
Stock Availability
This is where you can specify the number of items in stock. This gets displayed in the product catalogue for the sales reps to see. See this guide on how to show accurate stock levels in the Onsight app.
Quantity Increment
If you have products with a specific pack size (the number of items that are sold in a case) then you can configure this product to be added to the order or quote in increments of the pack size. Fill in your pack size into this field. For example, if your pack size is 6, fill in 6 to be able to add items to the cart in increments of 6.
Minimum Quantity
Each product can have a minimum quantity per order or quote.
Maximum Quantity
Each product can have a maximum order quantity per order or quote.
Product Categories
Each product needs to live inside a category or sub-category. Enter the names of your categories in these columns to create your category structure and allocate each product to its proper place. Some rules to be aware of:
- Categories cannot contain both subcategories and products. Therefore, if a category already has products in it, you can’t create a new subcategory, and if it already has subcategories you won’t be able to add products to it.
- Master Products and Variants must both be in the same category.
Custom Fields
The custom field columns will only appear if you have defined custom fields for your products and if you have created some values for those custom fields. The columns will be named: ‘Custom Field Name’ and ‘Custom Field Value’ , etc. . Custom fields allow you to store additional information for each of your products. This will then be displayed in the catalogue on the mobile app. It can also be displayed on your orders and quotes. Custom fields can be added by inserting additional columns after the categories columns.
When entering non-text values such as dates, monetary amounts and numbers, the cells needs to be formatted as ‘Text’ before you type something into it so that whatever you type into the cells remain as you have typed it. If you do not do this, Excel will convert what you have typed into a date, monetary amount or number, and you will lose the formatting that you originally had.
Step 3: Upload the new product data
Save your file. Click on the ‘+’ button and select your saved data sheet on your computer. Once done, click on ‘Continue’.
Step 4: Import the new product data
Click the ‘Import’ button to start the import process. Your data sheet will be analysed and validated. Once the import job progress is at 100%, click on either:
‘For review – view and approve this job’. If your data sheet passes validation, you will see a list of updates that will be applied once you approve the import job. If everything is correct, click ‘Approve Job’ and your data will be imported into the database.
or
‘Failed – view the job’. If the data sheet fails validation, a list of errors will appear, which you must correct before uploading it again. Click on ‘Cancel Job’ and correct the data in your upload data sheet and then start at Step 3 again.
Check on your import jobs
If you navigate away from the import process whilst it is running, you can come back later to check on the progress. To see the status of all your import jobs, go to ‘Import & export data’ > ‘Import jobs’ and you will see them all listed. Click on the file name to see the detailed progress.
Still have questions?
If you are still uncertain of how to proceed or if you encounter any problems email us at [email protected] and we will help you through the process step-by-step.